topbar

Welcome to my HE blog ..

Monday 10 September 2018

Unit 10: Website Design

Unit 10: Website Design


Server technologies and management services associated with hosting and managing websites

Website Hosting services
What is DNS ?
Search Engine Rankings
Sever Technologies
Dynamic content V Static Content
Common Web Technologies


Website technologies, tools and software used to develop websites

What is UI?
What is UX?
What are Back end technologies?
What tools can we use to make websites?
Making a Website Secure.

Utilise website technologies, tools and techniques with good design principles to create a multi page website

Client requirements for websites
Look and feel of website

Considering the target audience
Create a Website

How to make website perform well

Create and use a Test Plan to review the performance and design of a multi page website

What is user trust?
What is SEO?
WC3 Validation of website
Creating a plan to test the web site
Can we prove the website work well in all circumstances


Thursday 23 August 2018

New HNC 2017

Higher National Certificate 

New BTEC Spec. 

Unit 1: Programming
Unit 2: Networking
Unit 3: Professional Practice
Unit 4: Database Design & Development
Unit 5: Security
Unit 6: Managing a Successful Computing Project
Unit 8: Computer Systems Architecture
Unit 10: Website Design

Click on the above links for further information

Thursday 10 May 2018

Webdesign Assignment Three

Webdesign Assignment Three 

Start by looking at feedback given with meeting with clients.

Then show what the final website is to the client.

Critically reviewed your website comparing it to other websites that offer similar services. Take into account both positive and negative factors in the website. Be realistic about your own abilities compared to professional web design companies.

Now it’s time to reflect on the process and look at other HCI developments.

Create a report (in any form you want) that looks at recent HCI developments and how they are used. So look at mobile webs and how they differ from their large screened PC cousins. What are the significant differences and how and why have they come about?

How would you develop a website that could work on mobile and full screen or are they separate, discuss this concept and give example?
Upload before 28th May 2018

This covers Unit 10: Human Computer Interaction


The document to cover the following :

Understand recent human computer interaction related developments and their
application

HCI: historical development; motivation; techniques; guidelines; principles; standards.
Developments in technology: changing workstation environments eg screens, keyboards,
pointing devices; other non standard input/output devices eg speech recognition; related
processing developments and information storage possibilities
Developments in HCI: examples eg virtual machines with command line input, graphical
interfaces, screen design for intensive data entry; intelligent HCIs; virtual personas; changing
concepts of ‘look and feel’
User issues: range of users eg expert, regular, occasional, novice, special needs; ergonomics; human information processing; impact on the workplace

Development of systems: new developments eg event-driven systems, use of multimedia;
modelling techniques; implication of new developments on user interfaces; implication of
developments on hardware eg storage, processing requirements; convergence of systems
Applications: selection of HCIs eg touchscreen, voice activated

Thursday 3 May 2018

Assignment 2 - 2018 session

Website Design : Assignment Two – the site

Task 2)

From your proposed layout that has been modified according to the needs of the customer create the 5 page website. Document website (do screenshots) and discuss design and justify it (M2) and also document how unforeseen circumstances have been accommodated (D2).

(Unit 14 LO2 : 2.1 / Unit 10 LO3 3.1)
(Unit 14 M2 & Unit 10 M2 – design of method justified looking at visual aspects and coding /
Unit 14 D2 & Unit 10 M2 - unforeseen circumstances have been accommodated for different browsers and devices)

Document how the website was created; use screenshot explaining your steps.
(Unit 10 LO3 3.2 + 3.7)

Test the website for functionality and document problems encountered and how you overcame them, the get some other user to evaluate your website and document there feedback
(Unit 14 LO2 : 2.2 / Unit 10 LO3 : 3.5 )

Test the website and see if you can break it! Document the results
(Unit 10 LO3 3.4)

Then critically review your website comparing it to other websites that offer similar services. Take into account both positive and negative factors in the website. Be realistic about your own abilities compared to professional web design companies.
(Unit 10 LO3 3.3)

Merit is given for clear structure and ease of readability

Assignment 2
Due 17/5/18 --- Reviewed from 3/5/18

Monday 12 March 2018

37 38 and 39 assignment


Client Brief

You work as an apprentice games designer for Epic games you have been introduced to the Unreal Development Kit (UDK). You have also been looking at some 3D animation tools such as Z Brush, 3D studio Max and Blender.

You have been asked to design a concept for a game.


Task 1)

As the apprentice you have been asked to create a simple3D computer game for target age of 12+ age group.

The task is to create 3 rooms or level game with interconnected levels.

You can create a simple FPS or TPS based game or any genre which

The first room is the largest and is set in an outside environment with landscaping and grass and some water features, such as stream(s) and/or a water fall. Create a Sun and trees and grass and give the feel of a large landscaped environment.

Another room is inside or enclosed environment. The lighting in this environment should be limited to reflect this.

The third room is the final level.

Show screenshots of how this game was created and use appropriate text to explain the work you have done. Show the Kismet used and the properties of the individual aspects and why they are set the way they are set.

Also in a paragraph discuss the game concept and how you came about coming up with the game idea.
Task 2)

Once the Game has been created play test it and create a video of your gameplay explaining the game as you go.
Task 3)

Get a friend to test your game and critically evaluate your game.


Unit 38 and 39 Assignment
Unit 37 Assignment


Saturday 10 March 2018

Unpacking the Code part One


UnPacking the Code...

As explained in my excellent post Phaser Games states a well designed Phaser game has game states.
These game states are separate JavaScript programs or files. These are shown in my example as preload, create and update. These name come from the original tutorial from Phasers.io own tutorial section. These are all loaded separately like this :-

<script src="js/preload.js"></script>
<script src="js/create.js"></script>
<script src="js/update.js"></script>

One of the main advantages or separating a game into separate sections is that we can have a reusable code sections that we can use elsewhere. Intelligent code design is about managing our code into logical sections. We could put all three together into one piece of code and it would perform the same function. However for larger games this get messy.

So lets think about a game that has multiple levels. Lets talk about how to design this using just the concept of game states!

So the preload section is all about loading up the sounds and the sprites ready to display them. Its like the RED in a traffic light sequence!

The Create is about the initial placement (physics ect..). The score is set to zero every thing is ready to go. Its like the AMBER in a traffic light.

The update is the game is playing we deal with animations, collision, score increasing dealing with damage and dying and ending the game or moving to next level. Its like the GREEN in a traffic light sequence!

So for One level we do preload then create and finally update.

So what do we do for 2 levels then ?

When its harder than you think bu the answer is this...

Preload
Create - level 1
Update  - level 1
Create - level 2
Update  - level 2

So you do a create and update for each level as well and you only usually need one preload. 

Ok this is all fairly basic coding really and also it is how I do code design and I am not saying this is the perfect way of doing this for large projects but... Its clean a it works for what we are looking at..

So the reality is you could have for a 2 level game code that looks like this ...

preload
Lose

GameOne and GameTwo have the basic setup of both create and update functions.

create: function() { },
update: function(){ },

Using these basic principles you can create a multileveled Phaser game!

Goto http://phaser.io/examples and find the code you want and then put it into the correct structure and voilĂ  you are away.


Sunday 4 March 2018

Rapberry Pi as a Web game machine


The raspberry pi 3 @ £32 is an excellent budget computing solution for all manner of computing projects. So for my web based gaming module I use them with my students. So in this post I will show how to setup a Raspberry Pi 3 as a web gaming system!

Step One : get your self a Raspberry pi 3 a 16gb micro SD card. You also need a usb keyboard and mouse as well as a hdmi cable and hdmi monitor. If you just want an easier solution order the excellent starter kit sold by (www.modmypi.com).

Step Two : Download the latest Raspbian OS (stretch at the point of writing this blog) from the raspberry pie official website.

Step Three : Install the Raspbian OS to the micro SD card (no we don't use NOOBS but I suppose you could try to if you wanted). I use some software called etcher (https://etcher.io/) its free and is an easy to use image writer. You may also need to get a card reader as well for the SD card so you can write images to it.


Step Four : Setting up a raspbian OS. Ok so put the SD card in the Raspberry Pi 3 and turn it on and look at the monitor. Assuming everything is OK then you screen will look like this...


So its beginning to take shape now. Next you need to connect the Pi to the network, either wirelessly or wired. Depending on you situation, then test you connection by browsing the web using the pies default chromium browser.

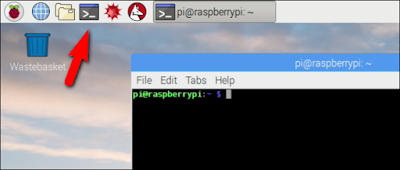
Step Five : Web server installation. Now we come to the juicer part of the process. Use the Terminal icon (see below).


Type in the following commands (and press return at then end of each line to execute them).

sudo apt-get update

This updates/patches the raspbian to the latest patch version (its like a Microsoft patch but less annoying and controlling).

sudo apt-get install apache2 -y

This install the Apache web server. Then test it by opening up the chromium browser and put in localhost as the site you wish to browse.


Ok so now we are getting somewhere. Next we need PHP.

sudo apt-get install php7.0 -y

Step Five : Setting up Midori browser on the Pi. Midori used to be the default browser of choice on the Raspberry pi but it has recently been replaced by Chromium. However in  my experience (and at the time of writing this blog). Midori is the only PI browser capable of looking at Phaser games (on PI client system).

sudo apt-get install midori -y

Step Six : Phaser games and Engine setup. This is the easiest part!

I have written a blog about that, however there are some differences. I talk about WAMP in that post but here I talk about a Raspberry pi. I use both depending on the circumstances and I am getting more and more a fan of the pi since I wrote that post. We need to run some more commands

cd /var/www
sudo chown -R pi .

This changes the directory to www and sets the default user pi as the owner of this folder and subfolders. We have a subdirectory called html were all the files are stored. So look at my excellent post and have fun!


In my next post I will discuss how we edit phaser games using the Pi.


Sunday 25 February 2018

PHASER Game States


When Using the PHASER gaming engine their are several consideration we need to take. The Engine version itself is important we use and I use Phaser v2.9.1 Engine

The file is here

The Engine is actually a file called phaser.min.js and is actually a massive library of functions we call.

Its called at the top of  main HTML file we use in the head section 

Like this :-

<script src="js\phaser.min.js"></script>

I put it in a sub directory called JS but it can equally be in the assets folder or in the root directory (buts that is not very good design).

When you go through the example shown before you see all the code is done with in the actual HTML code within <script> tags to show it is Javascript. In reality this is poor code design and is cumbersome and not very reusable.

To get around this we use game states that are reusable Javascript code segments stored in individual files. We use (at least intially) 3 main pieces of code. These are preload, create and update codes.
These are also imported in the head section of HTML.

<script src="js/preload.js"></script>
<script src="js/create.js"></script>
<script src="js/update.js"></script>

Each code section does different elements but if you look at the tutorial you see all of them shown in the HTML section in the <script> section. By separating them away from the HTML and doing them as separate code we are starting to use true event driven code design which is efficient and reusable.

Here is a link to my code download it and put in on your web server (using the folders it creates or it wont work in the WWW folder on a WAMP server).

Within the HTML file (I use index.html in my example)

var game = new Phaser.Game(800, 600, Phaser.CANVAS, '', { preload: preload, create: create, update: update });
game.state.add('Preloader', Preloader);
game.state.add('create', create);
game.state.add('update', update);
game.state.start("Preloader");

One thing to notice / be aware of is each game state calls the next, in my example preloader starts fitst then when it finishes it calls create and then that calls update.

When creating a game with multiple levels you would create separate code for each level (or page). So as each level is complete it calls the next level. 

I will show this happening in my next blog...

Have fun and keep on gaming


OO Design post

Object Oriented Design 

In  simple terms this unit is using code to develop how :-

Non player character : So looking at how a AI character interacts with its environment and the player character.

Code we use within a environment.

Code we use within a player character.


Within Unreal 4 engine we use blueprints (simpler than c++ code)

I have been reading many forums and watching many youtube tutorials.

A good one is a series by 'MrFantasticGhost' called Horror game, which links with our theme of 'Killer Clowns'.

Below is a link to the series.

Monday 19 February 2018

Task 1 : games design

Task 1: Games Review

For Games Design in a table critically compare different types of computer games and
their platforms they run on. So you could compare GTA5 on PS3 to Gears of War on Xbox to Mario
on Wii U. I would expect at least 3 modern games and 3 difference modern platforms. Then in a
separate paragraph compare the way the games are controlled (i.e. compare the controllers) and
give your view as to advantages and disadvantages to the controller methods available.

Then to Conclude with a look at the impact computer games has had on society. List the good and bad aspects that gaming has given.

Look at these posts.

https://waynecheeseman.blogspot.co.uk/2016/09/to-flap-or-not-to-flap.html
https://waynecheeseman.blogspot.co.uk/2015/02/week-18-best-game-review.html

Task 2 :

Look at Maya, 3D studio Max and Blender compare these modelling and animation software and compare and contrast them. Look at the technical requirements for them as well. Use a similar approach to how you reviewed the games. Include costing as well.


Deadline : 2/4/18


Thursday 8 February 2018

Unit36


Task 1)

Investigate what the hardware and software is needed to used, both for a simple low usage test system and a high usage production system. Document both these system for you manage, both hardware and software requirements. For a test system you are looking for max of 5 people using it and for production system up to 500 users could use this system.

Task 2)

Now it’s time for you to setup a low usage test system, document how this is done and what you used and why.

Cover what the server can do, how it is configured. How databases can be used on it etc.

Also show the web app been used (errors as well as successes).

Critically test and review the system.

Task 3)

Now design the web application as specified. Show your php code and how the mysql database is setup (what are the fields etc).

Screenshot and document the development process and your ideas.

This covers the following BTEC criteria :-

Task 4)

Test the system both hardware and software and critically review its performance.

Does the system you created work as per brief?
Can you edit the address book?
Can you just view addresses and not edit them?
What errors do you have?
Does it work at all?
What security have you used and why?
Does it work at all?

(An non – working system is not a failure, just document what happens and then discuss what you wanted)

Thursday 1 February 2018

SOHO : Scenario One

Design a SOHO solution for your office


You are a small Niche IT VAR working from a rented space.

You’re niche market VAR and you resell gadgets, specifically reselling ‘internet of things’ devices. You demonstrate a lot of these devices in this rented space, also you need capabilities to have mobile kit so you can demonstrate this type of kit outside your office remotely to customers around the world potentially.

What would you need (from a empty room, no kit or furniture)? 

List equipment.

What's the cheapest solution you could have? (justify)

Give another solution that would look more professional has better kit and is still under 15k (aim for 10k).

Then I need both a home and mobile* solution (both within 15 to 10k for 2nd option).

*Mobile as in you can take elements to customers to show them directly.


Part of this process is project management.
  1. Your doing it (so no cost except time). 
  2. Assume you are in sales and don’t know IT and cost of 3rd party doing all setup. 
You need a secure room to store stock.

Create a Visio diagram of officer layout including all kit needed and location of desks, doors etc.

Task One
Task Two
Task Three
Task Four

Thursday 11 January 2018

AI Game


Build a game with at least 2 AI elements..


Build an interactive game that consists of at least two AI components. This can be either a 2D or 3D game using the UNITY game engine (look at suggested games in list below). This game should be a core element of a game, not a fully working game as such. For example it could be one level that show cases the core AI elements and how they are used. This game is created individually and can include 3D models created in 301 module of this Degree.

You will be marked on a good design of at least two AI components and how they have been implemented by you in terms of re-usability and software patterns. Your analysis should include the rationale behind your design decisions as well as a discussion on any improvements you would consider.

Game type

For 2D: Maze game, Space Invaders, Snake, Snakes and Ladders, Break-out, Tetris, Pac-Man, Super Mario, Bomber Man or similar game.
For 3D: First or Third person shooter or survival game or simular

Marking Criteria

You will be assessed on: the software implementation, as well as a report where you will explain how you have done the implementation, the problems you faced as well as diagrams explaining the most significant aspects of your work. Also note that all the code must be provided in the Appendix section.
The structure of the report must be the following:

  • Title page 
  • Abstract (or summary) 
  • Introduction 
  • Brief description of chosen game design 
  • Game implementation 
  • Conclusions 
  • References

Unit 71: Assignment one upload point

Upload your work to this post pls.