The raspberry pi 3 @ £32 is an excellent budget computing solution for all manner of computing projects. So for my web based gaming module I use them with my students. So in this post I will show how to setup a Raspberry Pi 3 as a web gaming system!
Step One : get your self a Raspberry pi 3 a 16gb micro SD card. You also need a usb keyboard and mouse as well as a hdmi cable and hdmi monitor. If you just want an easier solution order the excellent starter kit sold by (www.modmypi.com).
Step Two : Download the latest Raspbian OS (stretch at the point of writing this blog) from the raspberry pie official website.
Step Three : Install the Raspbian OS to the micro SD card (no we don't use NOOBS but I suppose you could try to if you wanted). I use some software called etcher (https://etcher.io/) its free and is an easy to use image writer. You may also need to get a card reader as well for the SD card so you can write images to it.
Step Four : Setting up a raspbian OS. Ok so put the SD card in the Raspberry Pi 3 and turn it on and look at the monitor. Assuming everything is OK then you screen will look like this...
So its beginning to take shape now. Next you need to connect the Pi to the network, either wirelessly or wired. Depending on you situation, then test you connection by browsing the web using the pies default chromium browser.
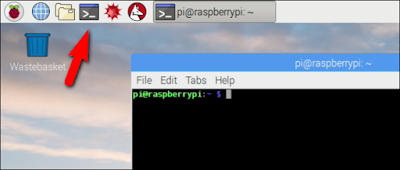
Step Five : Web server installation. Now we come to the juicer part of the process. Use the Terminal icon (see below).
Type in the following commands (and press return at then end of each line to execute them).
sudo apt-get update
This updates/patches the raspbian to the latest patch version (its like a Microsoft patch but less annoying and controlling).
sudo apt-get install apache2 -y
This install the Apache web server. Then test it by opening up the chromium browser and put in localhost as the site you wish to browse.
Ok so now we are getting somewhere. Next we need PHP.
sudo apt-get install php7.0 -y
Step Five : Setting up Midori browser on the Pi. Midori used to be the default browser of choice on the Raspberry pi but it has recently been replaced by Chromium. However in my experience (and at the time of writing this blog). Midori is the only PI browser capable of looking at Phaser games (on PI client system).
sudo apt-get install midori -y
Step Six : Phaser games and Engine setup. This is the easiest part!
I have written a blog about that, however there are some differences. I talk about WAMP in that post but here I talk about a Raspberry pi. I use both depending on the circumstances and I am getting more and more a fan of the pi since I wrote that post. We need to run some more commands
cd /var/www
sudo chown -R pi .
This changes the directory to www and sets the default user pi as the owner of this folder and subfolders. We have a subdirectory called html were all the files are stored. So look at my excellent post and have fun!
In my next post I will discuss how we edit phaser games using the Pi.


No comments:
Post a Comment